How to implement action sequences and cutscenes
Introduction
This post will show ways of implementing actions sequences and cutscenes in video games. The code is written in Lua, but the patterns can be implemented with other languages (except the coroutine approach, because not all languages have coroutines).
Action sequences frequently appear in games. In cutscenes, for example: a character approaches an enemy, says something, the enemy responds and so on.
Action sequences can be used when scripting NPC behavior and boss fights. For example, you can have a boss throw something at you, then laugh, then shook its fist in your direction. But implementing such things is not an easy task…
Table Of Contents
The problems with game loops
Unfortunately, standard game loop doesn’t make it easy for us. Suppose we have this game loop:
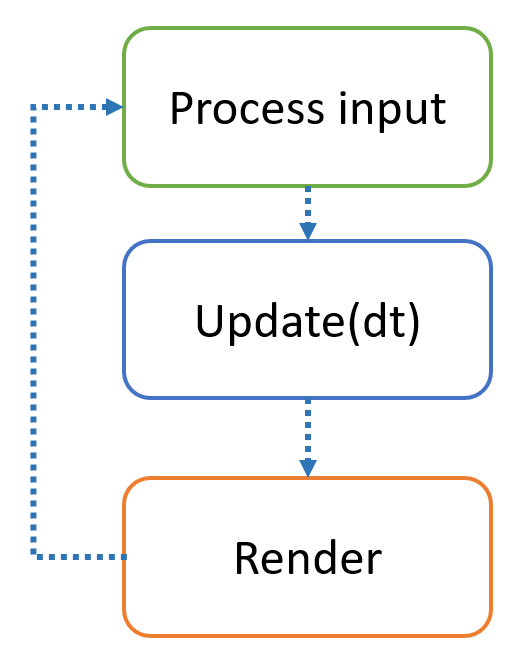
while game:isRunning() do
  processInput()
  dt = clock.delta()
  update(dt)
  render()
end
Now, suppose you want to implement the following cutscene: a player goes to an NPC, and the NPC says “You did it!”, and then after short delay it says “Thank you!”. In ideal world, we’d want to write it like this:
player:goTo(npc)
npc:say("You did it!")
delay(0.5)
npc:say("Thank you")
And that’s when we hit the first roadblock. All these actions take some time to complete. Some might even require user input - for example, to close a dialogue window before the cutscene can proceed further. As for delay, you can’t just call sleep function there, because the game will freeze. It won’t be updated and will be stuck in one iteration of the game loop.
Let’s take a look at some of the possible solutions to the problem.
Booleans, enums, state machines
The most obvious and brute-force way to implement action sequence is to store the information about its state in booleans, strings or enums. The code will look something like this:
function update(dt)
  if cutsceneState == 'playerGoingToNpc' then
    player:continueGoingTo(npc)
    if player:closeTo(npc) then
      cutsceneState = 'npcSayingYouDidIt'
      dialogueWindow:show("You did it!")
    end
  elseif cutsceneState == 'npcSayingYouDidIt' then
    if dialogueWindow:wasClosed() then
      cutsceneState = 'delay'
    end
  elseif ...
    ... -- so on...
  end
end
This approach can easily lead to spaghetti code and long if-else chains, so I’d recommend to avoid it.
Action lists
Action lists are similar to state machines. Action list is a list of actions which are executed sequentially. You can think of an action as a state in state machine. We update the current action in every iteration of game loop. If we see that the action has finished, we move on to the next one.
In our example, we can implement the following actions: GoToAction, DialogueAction and DelayAction. Let’s look at the implementation of DelayAction.
I’m using middleclass library for OOP in Lua
-- constructor
function DelayAction:initialize(params)
  self.delay = params.delay

  self.currentTime = 0
  self.isFinished = false
end

function DelayAction:update(dt)
  self.currentTime = self.currentTime + dt
  if self.currentTime > self.delay then
    self.isFinished = true
  end
end
ActionList’s update function looks like this:
function ActionList:update(dt)
  if not self.isFinished then
    self.currentAction:update(dt)
    if self.currentAction.isFinished then
      self:goToNextAction()
      if not self.currentAction then
        self.isFinished = true
      end
    end
  end
end
And finally, our cutscene looks like this:
function makeCutsceneActionList(player, npc)
  return ActionList:new {
    GoToAction:new {
      entity = player,
      target = npc
    },
    SayAction:new {
      entity = npc,
      text = "You did it!"
    },
    DelayAction:new {
      delay = 0.5
    },
    SayAction:new {
      entity = npc,
      text = "Thank you"
    }
  }
end

-- ... and then somewhere in update:
actionList:update(dt)
In LuasomeFunction({ ... })can be written assomeFunction{...}, that’s why instead of writingDelayAction:new({delay = 0.5})we can writeDelayAction:new{ delay = 0.5 }
This looks much better. We now have a clear sequence of actions. If we want to insert new action in a cutscene, we can easily do so. And we can reuse common actions in lots of action sequences.
See this talk by Sean Middleditch for more details and trickier usages of action lists:
Action lists are very useful. I’ve used them for several years before discovering coroutine approach and was very happy. But then I wanted to make more complex cutscenes like this:
local function cutscene(player, npc)
  player:goTo(npc)
  if player:hasCompleted(quest) then
    npc:say("You did it!")
    delay(0.5)
    npc:say("Thank you")
  else
    npc:say("Please help me")
  end
end
With action lists you’ll need non-linear lists to make this happen. This can be accomplished by actions having tags. Then, you’ll be able to jump to a tagged action instead of the next one. This works, but it is not as readable as the function above.
We can make this code real with coroutines.
Coroutines
Coroutines basics
Coroutine is a function which can be “paused” and “resumed”. It is executed in the same thread as your main program. No new threads are created for it.
Coroutines can be paused with coroutine.yield and resumed with coroutine.resume. Here’s a simple example:
local function f()
  print("hello")
  coroutine.yield()
  print("world!")
end

local c = coroutine.create(f)
coroutine.resume(c)
print("uhh...")
coroutine.resume(c)
The output is:
hello
uhh...
world
First we create a coroutine with coroutine.create. Coroutine doesn’t start to execute after it’s created. It needs to be launched by coroutine.resume. f function is called then, it prints “hello” and then pauses itself by yielding. You can think of it as a form of return, but we can still resume the function afterwards by calling coroutine.resume if coroutine hasn’t finished its function.
If you pass arguments when calling coroutine.yield, they’re returned by coroutine.resume in the “main thread”. For example:
local function f()
    ...
    coroutine.yield(42, "some text")
    ...
end

ok, num, text = coroutine.resume(c)
print(num, text) -- will print '42    "some text"'
Here, ok is a bool, which shows the status of coroutine. If ok is true then everything is okay and next returned values are arguments of the last coroutine.yield call. However, if f calls error function or fails at some point, the first value will be false and the error message will be the second return of the function. Let’s see a failing coroutine:
local function f()
  print(1 + notDefined)
end

c = coroutine.create(f)
ok, msg = coroutine.resume(c)
if not ok then
    print("Coroutine failed!", msg)
end
Output:
Coroutine failed!
input:4: attempt to perform arithmetic on a nil value (global ‘notDefined’)
Similarly, you can pass values to a coroutine when calling coroutine.resume and the results will be returned by coroutine.yield:
local function f()
    ...
    someNum = coroutine.yield()
    print(someNum) -- will print "42"
    ...
end

...
coroutine.resume(c, 42)
Coroutine can be in different states which you can check by calling coroutine.status:
"running"- coroutine is currently running. This means thatcoroutine.statuswas launched from inside the coroutine’s function."suspended"- coroutine was paused or hasn’t been launched yet."normal"- coroutine is active, but isn’t currently running (it has resumed another coroutine)."dead"- the coroutine has finished running - function has finished its execution.
Now, let’s implement coroutine-based action sequence system with this knowledge.
Implementing cutscenes with coroutines
Here’s how our basic action will look like:
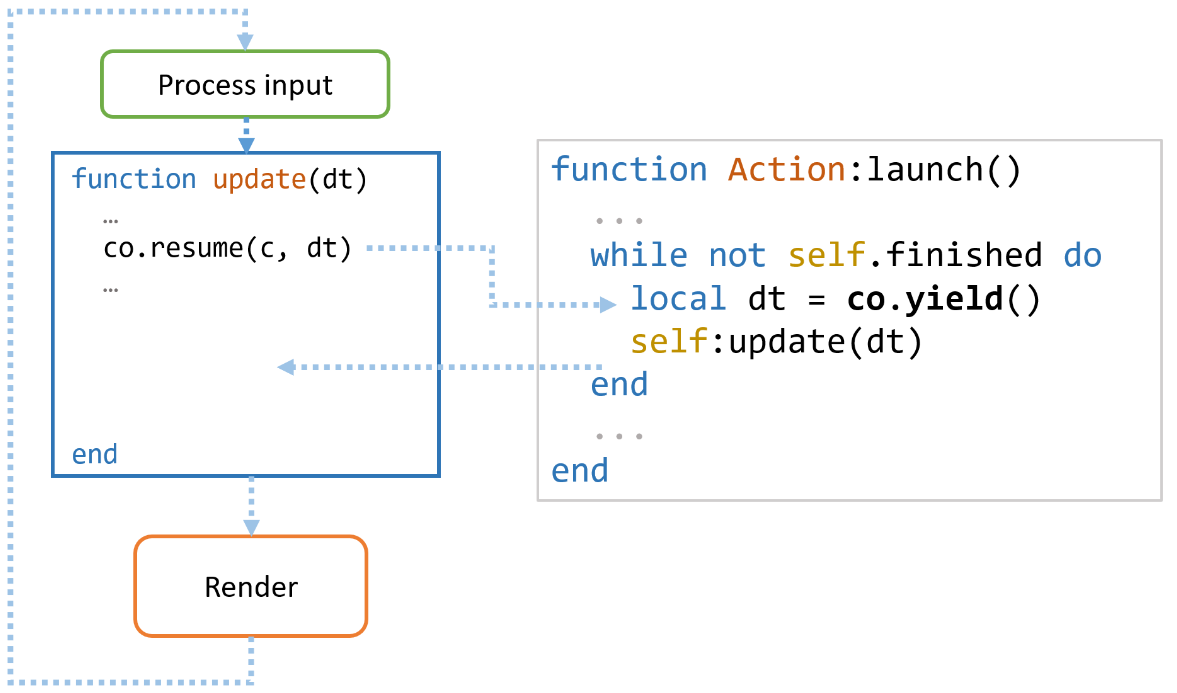
function Action:launch()
  self:init()

  while not self.finished do
    local dt = coroutine.yield() -- the most important part
    self:update(dt)
  end

  self:exit()
end
This is similar to what we have with action lists: the action calls update function until it’s finished. But it yields on each game loop iteration (Action:launch is called from some coroutine), while somewhere in our main update (for example, in some ActionSequenceManager which tracks the state of all action sequences) we resume it like this:
coroutine.resume(c, dt) -- note that we pass dt here
                        -- which is later used in actions's update
Our cutscene is a coroutine now:
function cutscene(player, npc)
  player:goTo(npc)
  npc:say("You did it!")
  delay(0.5)
  npc:say("Thank you")
end

-- later...
local c = coroutine.create(cutscene, player, npc)
coroutine.resume(c, dt)
Here’s how delay is implemented:
function delay(time)
    action = DelayAction:new { delay = time }
    action:launch()
end
Having such wrapper functions is very useful to make your cutscenes easier to read and use. Next, let’s see how DelayAction is implemented:
-- Action is a base class of DelayAction
local DelayAction = class("DelayAction", Action)

function DelayAction:initialize(params)
  self.delay = params.delay
  self.currentTime = 0
  self.isFinished = false
end

function DelayAction:update(dt)
  self.currentTime = self.currentTime + dt
  if self.currentTime >= self.delayTime then
    self.finished = true
  end
end
This is identical to action lists approach! Let’s take a look at Action’s launch function again to understand how it works:
function Action:launch()
  self:init()

  while not self.finished do
    local dt = coroutine.yield() -- the most important part
    self:update(dt)
  end

  self:exit()
end
As you can see, we can create init and exit functions to do something when action begins and ends. But the most important part is the while loop which executes until the action is finished. Here’s a visualization of the order of execution which makes it easier to understand:
Now, let’s see how we can implement goTo function:
function Entity:goTo(target)
    local action = GoToAction:new { entity = self, target = target }
    action:launch()
end

-- constructor is ommited

function GoToAction:update(dt)
    if not self.entity:closeTo(self.target) then
      ... -- perform AI movement logic here
    else
      self.finished = true
    end
end
It’s very easy to implement new types of actions.
Now, let’s see how we can use coroutines with events. Let’s implement WaitForEventAction:
function WaitForEventAction:initialize(params)
  self.finished = false

  eventManager:subscribe {
    listener = self,
    eventType = params.eventType,
    callback = WaitForEventAction.onEvent
  }
end

function WaitForEventAction:onEvent(event)
  self.finished = true
end
We can leave the update function empty for that one. This action will execute until an event of eventType is sent. As a practical example of WaitForEventAction usage, let’s implement say function:
function Entity:say(text)
    DialogueWindow:show(text)
    local action = WaitForEventAction:new {
      eventType = 'DialogueWindowClosed'
    }
    action:launch()
end
Nice and easy. Now, when dialogue window is closed by the player by the press of the button, it will send DialogueWindowClosed event. The action will finish and the next one will start.
It’s easy to implement non-linear cutscenes, which depend on player’s choice, for example:
local answer = girl:say('do_you_love_lua',
                          { 'YES', 'NO' })
if answer == 'YES' then
  girl:setMood('happy')
  girl:say('happy_response')
else
  girl:setMood('angry')
  girl:say('angry_response')
end
The implementation of say function is trickier there, because now you need to somehow return player’s dialogue choice, but it’s not that hard to implement. As you can see, we don’t need to implement special mechanisms for if-else statements and loops.
Advanced usage
It’s easy to make quests and tutorials using coroutines. Consider this function:
girl:say("Kill that monster!")
waitForEvent('EnemyKilled')
girl:setMood('happy')
girl:say("You did it! Thank you!")
You can also use coroutines for AI. For example, to make a monster traverse a path, you can do this:
function followPath(monster, path)
  local numberOfPoints = path:getNumberOfPoints()
  local i = 0 -- index of current waypoint on path
  while true do
    monster:goTo(path:getPoint(i))

    if i < numberOfPoints - 1 then
      i = i + 1 -- go to the next point
    else -- start from the beginning
      i = 0
    end
  end
end
When monster will see the player, we can just not resume the coroutine, so while that while loop looks endless, it isn’t.
It’s also possible to implement “parallel” actions in a way that both actions are performed at the same time, but the action sequence goes to next action only when both actions are finished. For example, consider two NPCs moving at different speeds. When they meet at meetingPoint, the cat says “meow”. We can implement it like this:
function cutscene(cat, girl, meetingPoint)
  local c1 = coroutine.create(
    function()
      cat:goTo(meetingPoint)
    end)

  local c2 = coroutine.create(
    function()
      girl:goTo(meetingPoint)
    end)

  c1.resume()
  c2.resume()

  -- synchronization
  waitForFinish(c1, c2)

  -- cutscene continues
  cat:say("meow")
  ...
end
The important part here is waitForFinish function which is a wrapper around WaitForFinishAction which can be implemented like this:
function WaitForFinishAction:update(dt)
  if coroutine.status(self.c1) == 'dead' and
     coroutine.status(self.c2) == 'dead' then
     self.finished = true
  else
    if coroutine.status(self.c1) ~= 'dead' then
      coroutine.resume(self.c1, dt)
    end

    if coroutine.status(self.c2) ~= 'dead' then
      coroutine.resume(self.c2, dt)
    end
end
You can also take it a step further and allow WaitForFinishAction to take an arbitrary amount of actions to synchronize. You can also implement an action which waits until one of the actions is finished. For example, this can be used for racing mini-games. You’ll be able to check when one of the cars arrives the finish line and then execute some action sequence.
Pros and cons of coroutines
Coroutine approach is very powerful. The action sequences and cutscenes written with it can be easily read and modified, even by non-programmers.
What’s also great is about it is that everything happens in one thread, so you don’t have synchronization or data racing problems.
The approach is not perfect, however. For example, it’s hard to handle saving. For example, suppose that you have a long tutorial which is just one big coroutine. The player won’t be able to save during this tutorial, because you’d have to serialize coroutine’s state and then resume coroutine exactly from the point it was paused at.
This is not a problem if you use coroutines for cutscenes, as it’s usually not allowed for player to save during them.
As for the long tutorial example - you can just separate your tutorial in chunks and then allow player to only save between them. For example, part A of the tutorial happens in a room without a save point. Then, there’s another room with a save point to which player goes once part A is finished. Then, part B begins. If you separate tutorial into two coroutines, serializing won’t be a problem, as you’ll only need to save a string which will contain info about the point of tutorial which player has completed.
Conclusion
As you can see, there are different approaches to implementing actions sequences and cutscenes. I believe coroutine approach is one of the most useful and clearest for writing action sequences and cutscenes. I hope this approach will make your life easier and you’ll make tons of complex and fun cutscenes with it.
Thanks for reading!